Introductory notes
First a note about period sources; To date have found two pictures from manuscripts that are of portable ovens: http://www.flickr.com/photos/vrangtantebrun/3364577573/ and http://www.superstock.com/stock-photos-images/4069-3996
Both are mounted on wheels but otherwise on a stretcher and are vaguely dome shaped with very thick dark coloured material forming the body of the oven. Otherwise I didn’t find much else on the internet. However, the potter, Jim from Trinity Court Potteries, who made the liner, assures me there are plenty of finds. I cannot confirm that at this point.
I have interpreted the dark brown material to be daub which is a mixture of horse manure, clay and straw. This material is excellent if you are not travelling far and aren’t afraid of a little horse poo in your food. However, in a modern setting where it will be in and out of cars etc it can become a little friable so I have substituted brown plaster mixed with straw.
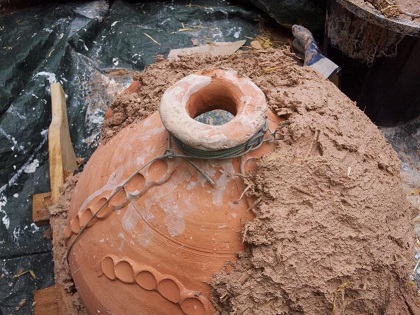
I have built my oven based around a ceramic liner but again there is no evidence of this from the pictures. However it makes sense as a way to build the oven. The only other way I can think of would be build the oven over a form of some kind that could then be removed. This way seems simpler.
Make your Oven
Materials
- One ceramic liner (Trinity Court Potteries does one but they are not the only source.)
- 3-4m of 100mm x 20mm oak planking
- Some leather or wool.
- A few panel pins or other small nails.
- One large bag of brown plaster undercoat.
- Some straw
- Some wire. Copper or steel pulled wire would be best but I ended up having to use something like clothes line to some effect.
First you will need to make the stretcher.
To do this I used three spreaders to keep the side beams apart. As I used 4” planks I used the following dimensions for the spreaders.
I chose 450mm because the oven liner was 400mm wide. If I was to do this again I would make it 500mm or perhaps even more as it was a bit of a tight fit getting the oven in.
The side beams with the handles, I simply made as long as I felt necessary and put three 2”x1” holes at 6” centres, three inches from the bottom and then cut handles into the ends. I think I used something like 1m long side beams.
I also made some individually fettled wedges for the front and back spreaders to hold them in place. There is no need to put them on the middle one as it will be held in place regardless.
You now have a stretcher to carry the oven. As the oven is rather heavy I used oak, which is also quite heat resistant. I also spaced out my stretcher bars mostly so that I would have enough space to take the oven liner but also because having a gap between the bars allows you to inspect them for charring to make sure that the whole thing isn’t going to fall apart on you.
Once you have your stretcher you need to cover the spreader bars with a something to stop the plaster falling through and also to give you a little insulation between the plaster and the oak. I nailed on some leather.
One more thing you need to do before applying the plaster. You need to drill two holes at each end of the middle spreader to take the wire that will hold on the liner. Install the wire now ready to hold on the liner.
So now to the plaster… Firstly you will need a layer of plaster on top of the spreader bars I made mine about an inch think but more might be better.
To make up this plaster I mixed handful of straw to half a bucket of plaster and then enough water to make something that has the texture of a good thick mud! You really don’t need much straw it just gives you a little more structure when building the plaster dome.
The plaster is pretty nasty on your hands so I would use latex gloves for this but they must fit well or else they will be worse than useless.
Spread the plaster on with your hands and get a nice smooth layer.
Next place the liner on top of the plaster and wire in place.
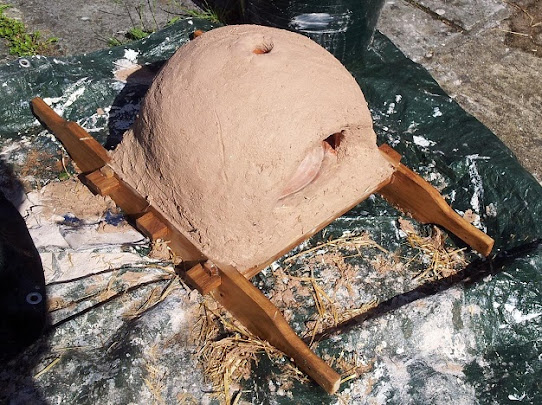
Then as you can see start to cover the whole thing with plaster making the distinctive hump shape from the pictures.
Then leave for a week to dry.
Use
We are still in the learning phase with the oven but so far we have found that its best to get the oven very hot and remove the fire before cooking. With the exception of tarts in ceramic dishes which you can leave some fire in.
How hot is hot enough, well when the fire is still going we found the best measure is when you can no longer leave your hand on the oven for any length of time but still being able to touch it was a good measure.
Good luck!


No comments:
Post a Comment