Wednesday 5 May 2021

To make short paste in Lent by Dame Edith of Hedingham

Original Recipe

Take thick almond milke seething hot, and so wet your flower with it: and Sallet oyl fryed, and Saffron, and so mingle your past altogether, and that will make good paste The good Huswifes Handmaide for the Kitchin, London 1594, 1597

This is an interesting recipe as it addresses an issue with pastry that isn’t often considered – how do you make pastry in lent when eggs and butter are forbidden. There are a large number of pies and pasties that are specifically Lenten recipes through the middle ages, however, how do you make the pastry acceptable?

The basic pastries of the 14th century that used only water would not have been an issue during Lent, but more complex butter and egg pasties would have been forbidden.
The above recipe is perhaps a way they got around the strictures.

The date is also interesting, it come from a collections recipes published in London at the very end of the 16th century and at a time when England’s view of itself as a protestant nation was firmly established and perhaps the holding of a strict Lent would have been on the wane. The need for a recipe for a Lenten pastry shows that for some (at least) it is still important enough to need a solution.

Breaking down the recipe.

The recipe is very vague in it is instructions with no indications of proportions or quantities. It does say it is for a "short" pastry. A classic modern short pastry is 2 parts flour to 1 part fat. However, the same principle cannot be applied to this recipe due to the level of liquid involved in both the almond milk and oil. I tried 2 different versions of this pastry using different proportions.


Version 1

  • 300ml Almond Milk
  • 300g plain flour
  • 50g olive oil
  • Saffron
I heated the almond milk to just below boiling point, to get it to "seething hot". In a separate pan I heated the oil and saffron. When the milk was hot, I poured it in to the flour and mixed two together. I then added the oil to bring the mixture together.
The texture was similar to a Hot Water Crust pastry, where you use butter / lard melted into water and then poured over the flour. I should also say it didn’t have the most appealing of smells, but that could just be me.
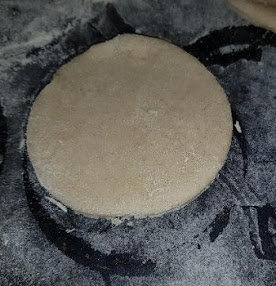
The pastry rolled out smoothly and easily cut very nicely.

Having made my pastry, I cooked it in 2 methods, frying and cooking in an oven as two of the most common methods for cooking pastry.

Frying

The pastry fried nicely and became fluffy.


The pastry tasted good with a light structure and it held up well under the heat of frying.

Baking

I then baked a batch in the oven 180C for 25 minutes.


The discs bake well and evenly and again came with the light texture I would expect from a short crust pastry.

Version 2 - Less almond milk and more oil

  • 100ml almond milk
  • 200g flour
  • 100ml oil
  • Saffron
For the next version, I reduced the amount of almond milk and increased the amount of oil.
As before I heated the almond milk and oil and combined them with the flour. The texture is (as you would expect) oilier but also more crumbly and as a result not as easy to use or roll out.


You can see from the photos the difference consistency in this second version.


This pictures shows how different the two pastries are. The left is the one with the greater oil and right is the one with the greater almond milk content.
As with the first version I cooked the pastry both by frying and by cooking

Frying

The pastry held up will under the heat and cooking evenly. However the oily texture was not helped by the additional oil in the frying. The taste was reasonable with an acceptable texture and could work for fried pastries.


Baking

Again, I baked the disks for 25 minutes at 180C


The baking of the pastry had the effect of the drying out the pastry and had the texture more of cardboard. The taste whilst not unpleasant it failed to give the light "short" feel that I would expect from a short pastry.

Conclusion

Based on these two versions, we can draw a few conclusions:
It is very possible and very simple to make a tasty and effective short pastry using almond milk
Only a very small amount of oil is needed to bring the pastry together.
This recipe not only gives us an interesting example of pastry techniques in the 16th century but also gives a very useful vegan /dairy free pastry recipe. This I feel wold be a much better version to use than a manufactured soya butter / margarine.

Final Recipe - enough for 1 pie

  • 300ml commercial unsweetened almond milk
  • 300g plain flour
  • 50ml of oil (light olive/veg oil)
  • Pinch of saffron (optional)
  • Pinch of salt
  1. If you would to use the saffron to give a light colour pre-soak your saffron in your oil.
  2. Heat the almond milk to just below boiling point - do not allow to boil over.
  3. In a separate pan gently heat the oil.
  4. In a large mixing bowl add the flour and salt and then pour in the almond milk, and mix quickly with a wooden spoon. Add enough of the oil to bring the mixture together in to a smooth paste.

How to make a wood fired bread oven suitable for the 15th Century by Master Thomas Flamanc of Kelsale


Introductory notes

First a note about period sources; To date have found two pictures from manuscripts that are of portable ovens: http://www.flickr.com/photos/vrangtantebrun/3364577573/ and http://www.superstock.com/stock-photos-images/4069-3996

Both are mounted on wheels but otherwise on a stretcher and are vaguely dome shaped with very thick dark coloured material forming the body of the oven. Otherwise I didn’t find much else on the internet. However, the potter, Jim from Trinity Court Potteries, who made the liner, assures me there are plenty of finds. I cannot confirm that at this point.

I have interpreted the dark brown material to be daub which is a mixture of horse manure, clay and straw. This material is excellent if you are not travelling far and aren’t afraid of a little horse poo in your food. However, in a modern setting where it will be in and out of cars etc it can become a little friable so I have substituted brown plaster mixed with straw.

I have built my oven based around a ceramic liner but again there is no evidence of this from the pictures. However it makes sense as a way to build the oven. The only other way I can think of would be build the oven over a form of some kind that could then be removed. This way seems simpler.

Make your Oven

Materials

  • One ceramic liner (Trinity Court Potteries does one but they are not the only source.)
  • 3-4m of 100mm x 20mm oak planking
  • Some leather or wool.
  • A few panel pins or other small nails.
  • One large bag of brown plaster undercoat.
  • Some straw
  • Some wire. Copper or steel pulled wire would be best but I ended up having to use something like clothes line to some effect.

First you will need to make the stretcher.

Details of strecher


To do this I used three spreaders to keep the side beams apart. As I used 4” planks I used the following dimensions for the spreaders.

Dimensions of spreader

I chose 450mm because the oven liner was 400mm wide. If I was to do this again I would make it 500mm or perhaps even more as it was a bit of a tight fit getting the oven in.

The side beams with the handles, I simply made as long as I felt necessary and put three 2”x1” holes at 6” centres, three inches from the bottom and then cut handles into the ends. I think I used something like 1m long side beams.

I also made some individually fettled wedges for the front and back spreaders to hold them in place. There is no need to put them on the middle one as it will be held in place regardless.

Leather covered stretcher
You now have a stretcher to carry the oven. As the oven is rather heavy I used oak, which is also quite heat resistant. I also spaced out my stretcher bars mostly so that I would have enough space to take the oven liner but also because having a gap between the bars allows you to inspect them for charring to make sure that the whole thing isn’t going to fall apart on you.

Once you have your stretcher you need to cover the spreader bars with a something to stop the plaster falling through and also to give you a little insulation between the plaster and the oak. I nailed on some leather.

One more thing you need to do before applying the plaster. You need to drill two holes at each end of the middle spreader to take the wire that will hold on the liner. Install the wire now ready to hold on the liner.

So now to the plaster… Firstly you will need a layer of plaster on top of the spreader bars I made mine about an inch think but more might be better.

To make up this plaster I mixed handful of straw to half a bucket of plaster and then enough water to make something that has the texture of a good thick mud! You really don’t need much straw it just gives you a little more structure when building the plaster dome.

The plaster is pretty nasty on your hands so I would use latex gloves for this but they must fit well or else they will be worse than useless.

Spread the plaster on with your hands and get a nice smooth layer.

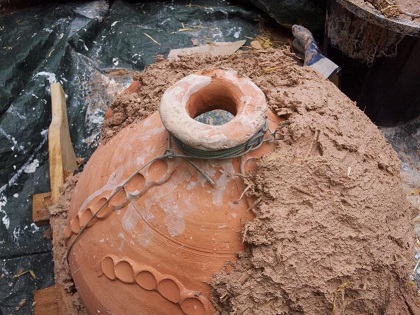
Next place the liner on top of the plaster and wire in place.

Plaster construction details

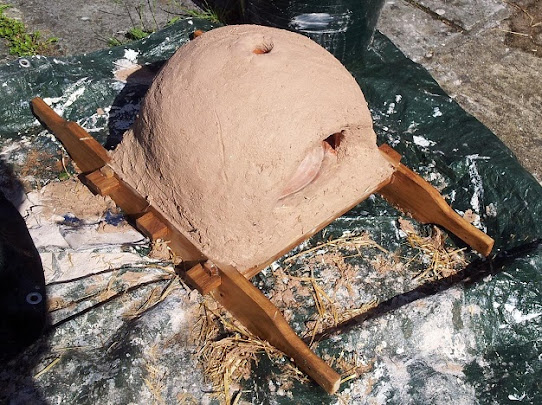
Then as you can see start to cover the whole thing with plaster making the distinctive hump shape from the pictures.

Picture of Oven

Then leave for a week to dry.

Use

We are still in the learning phase with the oven but so far we have found that its best to get the oven very hot and remove the fire before cooking. With the exception of tarts in ceramic dishes which you can leave some fire in.

How hot is hot enough, well when the fire is still going we found the best measure is when you can no longer leave your hand on the oven for any length of time but still being able to touch it was a good measure.

Good luck!

16th Century German Brickstitch Bag by Lady Alays de Lunel

Country of Origin: Germany
Period of origin: 14th century

When I started doing the brickstitch embroidery, I didn’t know that I would make a bag out of it. I just wanted to try brickstitch and after I had done a small bit decided to keep going to have enough for a bag.

The pattern I used is from an extant sample in the V&A and charted by Richard Wymarc. You can find an image of the original document at the Victoria and Albert Museum.

I used materials that I had at hand. Some evenweave fabric with much smaller count than the original piece which is 37 and cotton embroidery thread. I started with MCM thread but ran out and replaced with similar colours from the Anchor brand.

I used the full thread, all 6 plies, as the thread count was so small and I wanted to make sure that the fabric was covered.

When I was starting to do the embroidery, I tried to different ways to stitch.

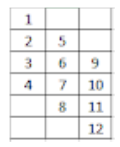
  • Uses less thread, but twists the ground fabric more: come out at 1, go down in 4, come out at 8, go down in 5, come out at 9, go down in 12…
  • Uses much more thread, but distributes tension on ground fabric more evenly: come out at 1, go down in 4, come out at 5, go down in 8, come out at 9, go down in 12

stitch arrangement

The original has four squares on each side ornamented with a pelican in her piety pecking its breast, interlaced blossom devices, a curved rendering of the gammadion and the letter ‘M’ worked in gold thread, couched. But I didn’t do those as I didn’t have detailed patterns for that and it was my first attempt of brick stitch. The original was lined with red plain-woven silk, but I used dark blue fabric that I had at hand. The drawstring of the original is a fingerloop braided string. I didn’t have the opportunity yet to practice this technique, so I made a lucet draw string. I left off the tassels as I will not use this as a bag hung from a belt.

I formed the embroidered rectangle into bag by folding in in half and sewed the bottom and the side together.

I liked doing the counted embroidery (much more than free embroidery which requires shading) and in my next project I am going to attempt a much closer reproduction of a brick stitch purse.

I put this bag in the A&S Protector competition at Raglan Fair 2017 and was lucky enough to win. Afterwards a lovely visiting SCA lady (I think from Lochac) gave me some more tips, e.g. to use skeins used for weaving instead of normal embroidery thread as it comes in larger batches.

References

Medieval furniture for Mundane Travel - the Chest by Lady Cornelia vom Distelfeld

Introduction

image of box
The idea behind this piece is a very old one – a Viking’s sea chest served as both a benchand a piece of shipboard luggage, and wooden chests to serve as both containers and furniture are ubiquitous in period.

Mine has been updated to fit the demands of modern travel – specifically, it is designed to be accepted as hand luggage on easyJet, which at the time of writing, has restrictions on hand luggage size, but not weight, provided you can lift it into the overhead locker yourself.

These instructions should be easy for anyone with even basic woodworking skills to follow. All pieces can be pre-cut at your local lumber yard or DIY shop, and all joins are simply butted, glued, and nailed. This is a slight change from period construction, where the front and back boards would usually be lapped with notches cut in the side pieces and the floor held by a dado, but modern glue will help make up for the weakened joint in this simplified version.

Design

The maximum dimensions for cabin baggage on easyJet1 are 56x45x25cm. As a standard chair is around 45cm high, using that dimension as the height will yield the most comfortable seat. 25cm is a good depth for a backless bench, and a width of 56cm allows plenty of room for storage.

The rope handles are soft and retractable, and there is a hidden (modern) closure to avoid any extra bulk for the closure. The lid is the largest piece, as it will overhang slightly on three sides.

You might be tempted to have the bottom of your chest sit directly on the floor to maximise the storage space, but it makes good sense to raise it a few cm off the ground. Not only will it be less wobbly to sit on, it will also keep the chest and its contents dry.

Materials

Wood

Plywood doesn’t look period – you will have exposed edges showing – and solid wood is quite bulky. For a good compromise on both, I used three-ply pine board in 12mm thickness to balance strength, weight, and period appearance. Anything much thinner will look and feel flimsy and might not bear your weight if used as a bench, thicker, and you reduce the amount of useful space and increase the weight.

If your wood is significantly (more than 5mm) thicker, make sure you adapt the dimensions of your pieces accordingly! You will need to subtract the difference in thickness from the length of the sides, and twice the difference from the width of the front and back. The dimensions of the lid stay the same.

The floor needs to be adapted to the exact thickness of your material in any case. Its width is the width of your side pieces minus twice the thickness of your wood; the length is the same as that of the front and back.

Parts List

Get the wood pre-cut to these exact dimensions unless you have the tools and experience to cut it accurately yourself. Usually, they will ask for your dimensions in mm.

Lid: 54cm x 24.5cm (540mm x 245mm) – you need one of these
Floor: 50cm x 21 (500m x 210mm) – you need one of these
Front & Back: 50cm x 39.5cm (500mm x 395mm) – you need two of these
Sides: 42.5cm x 23.5 (425mm x 235mm) – you need two of these

Rope

You can use natural hemp or hemp-like synthetic rope. Approximately 8mm to 10mm thick, 1m long. Tape is handy for wrapping the ends to prevent fraying and makes it easier to put through the holes.

Wood Glue

This can be regular hide glue or quick-drying, waterproof, etc., but it has to be wood glue .

Nails

You will need approximately 70 blackened wire nails with a wide head, around 2mm wide and twice as long as the wood is thick. Stainless steel, zinc-plated, etc. just won’t look medieval.

Hinge

My chest uses a nailed leather hinge as a simple, period solution. A piece cut from an old belt works well. A small wooden wedge attached to the chest with a string keeps the lid open for easier packing, as the stiff leather tends to pull the lid shut. You can also use a metal hinge, just be mindful of the potential added bulk and make sure it still fits the maximum dimensions. It can be sunk using a chisel.

Catch

I’m using a modern ball catch inside the chest to keep it closed – if you prefer a pretty medieval one on the outside, perhaps to match the hinges, keep the final dimensions in mind here as well.

Finishing

Finish isn’t mandatory, but adds to the look and the longevity of your chest. I finished mine using beeswax polish – other options include paint, stain, boiled linseed oil or even varnish. For something that will be exposed to a lot of moisture, marine-grade polyurethane varnish is a non-period but highly recommended option.

Tools

You will need at minimum a hammer and a drill, with a bit large enough to make holes for the handles. Sandpaper, a plane, or a file are needed to finish the edges of your cut wood. The catch is easiest to mount using small screws and an appropriate screwdriver..

The small architectural detail on the legs of my chest was made using a forstner drill bit to make larger holes, but you could also just use a saw to cut a triangle, or skip this step entirely.

Assembly

Before you begin, measure all your pieces to make sure the dimensions are right – one of my pieces had been mis-cut. Next, drill holes for the handles, about 5cm from the top of the side pieces and a hand’s width apart. Mark where the floor of the chest will sit – you can simply draw a line using the front or back piece – then cut a notch close to, but still under this line for the feet.


1 - Different options for making feet.

I used a forstner bit to drill three large overlapping holes for my “cloverleaf” shape. If you don’t have one, simply drill a hole at the top of your notch, then use a saw to make two angled cuts; it’s a lot easier to hit this hole than to have the two cuts meet exactly, and this avoids putting stress on the top when weight is put on the chest, which could cause the side pieces to split.

2 - The front and back attached to the floor.

Next, make a “U” shape from the front, back, and floor. Put a line of glue along the long side of the bottom piece, then nail the front or back to it to make an L. If you don’t have a workbench in which you can clamp the bottom piece flush and then lay the other piece on top, you can put a pile of books underneath to make this easier. (Just don’t get the glue on the books!) For even spacing of the nails, start with a nail at each end, then one in the middle, then another at the halfway point between those, etc. Wipe off any glue that squeezes out before it dries – be aware that it will block any stain you are using. When your “U” is assembled, glue and nail on the sides, making sure the tops of all parts are flush. At this point, you should gently round off all exposed edges and corners (including those on the lid, which we haven’t attached yet) with sandpaper or a rasp. This saves a lot of thinking about which edges to round and which ones to leave square!

3 - The sides attached to the U-shaped piece.

If you want to varnish, paint or stain the box, now is a good time, as you can still reach all the parts and the lid won’t get stuck shut. Especially make sure to protect the bottoms of the feet, as the end grain coming in contact with damp ground can wick moisture into the box.

Now stand your box up on a smooth surface – if it wobbles, gently sand the feet until it’s balanced. Next, nail the leather strip – either one strip nearly the length of the box or several smaller ones evenly spaced – on the long side of the lid of the chest, flush with the top. Lay the lid on the chest so that it overhangs both sides evenly and the back edges are aligned, then nail the leather hinges to the back of the box. Finally, attach your clasp.

For the handles, round off the edges of the holes with a file to make sure they don’t fray the rope, then pull the rope through so the loose ends are inside the box. You can either tie the ends together or make large individual knots that won’t slip through the holes. Ensure that both handles are the same length for balanced carrying. Ideally, your handles should be long enough to go over the top of the box, as this will make it much easier to carry!

Travel Tips

The easiest way to deal with this chest as a piece of hand luggage is with the help of two long quick-adjust luggage straps (mine are 350cm, from IKEA). They can be used to fasten the chest to your wheeled suitcase for travel to/from the airport, pulled through the rope handles to make a shoulder strap for when you’ve checked your luggage, and can be wrapped around the chest to keep it closed in the overhead locker.

Like many budget airlines, easyJet encourages passengers to check their hand luggage free of charge. You can make use of this to avoid having to carry the chest around – just offer to check it voluntarily, and the desk agent will usually agree once you’ve demonstrated that it fits the sizer!

If you plan to use the chest indoors – whether at events or as a side table at home – you can glue felt or cork to the feet to protect the floors.

Happy travels!

Footnotes

  1. To adapt the chest to the restrictions of the airline you are using, just ensure that it is about 1cm smaller in each dimension than the maximum allowed, so that it will easily fit in the luggage sizer – wood doesn’t squish like your regular bag will!
  2. This means it’s made of three layers, usually a lumber core and two thin pieces of veneer on the outside, rather than lots of thin, crossed layers like plywood.
  3. NB: for simplicity, I am using “length” to refer to the longer side and “width” for the shorter on all pieces, regardless of their final orientation on the finished chest. Ideally, you want the “length” to run along the grain of the wood, especially if not using plywood/core board. This increases the load-bearing capacity.
  4. Unlike other glues, wood glue, traditionally made from boiled hide, is not sticky. Instead, it is squeezed into the pores of the wood under pressure and hardens there, acting like hundreds of tiny dowels. The nails really only serve to hold the two pieces together until the glue has set.

Preface

The Journal of Divers Arts

They say we stand on the shoulders of giants and those of who would seek the recreate the past definitely do. We could not do without the hard work and time devoted by those who came before us both in our chosen hobby but also those in the past who chose to record for posterity the knowledge of their crafts and the various arts that make us who we are.

This journal is inspired by the works of a person known to history as Theophilus Presbyter whose great work On Divers Arts, published in the late 11th Century has certainly inspired me in my recreations of many of the facets of historical crafts. Its perhaps lofty intent is to serve as a repository of  knowledge and wisdom of those who practise divers arts attributable to the pre-seventeenth century and provide a home for those articles which might get lost and have no other home and I solicit you all to submit your knowledgeable works so that they might provide education and sources of inspiration for all.

I will publish articles as they come to me, I am not a professional historian, academic or writer but I am happy to provide guidance and help if you need it to get your article to the stage that you are happy to publish it. The only criteria I have for articles here is that they related to an Art or Science that was practised prior to the start of the seventeen century but I will pledge to try and keep the quality to a good standard but make no claims to knowing anything. I may also publish my own articles here from time to time but the more you send in the less I will need to engage in that practise so get submitting, I welcome wading through as many diverse articles as you can send me.

Whilst this journal is inspired by my involvement in the SCA and other re-enactment groups over the years it is not an official publication or website of any particular group or society,

John Sawyer

About the editor. John Sawyer is a professional engineer based in the South West of England who in his spare time has been a member of the Society of Creative Anachronism since 1990 and involved in other re-enactment activities since he re-emigrated back to the UK in 2002. He is also know as Thomas Flamanc of Kelsale to those in the SCA where is he a Member of the Order of the Laurel and as that Australian bloke in a number of other re-enactment groups with whom he has contact over the years.