Introduction
Mine has been updated to fit the demands of modern travel – specifically, it is designed to be accepted as hand luggage on easyJet, which at the time of writing, has restrictions on hand luggage size, but not weight, provided you can lift it into the overhead locker yourself.
These instructions should be easy for anyone with even basic woodworking skills to follow. All pieces can be pre-cut at your local lumber yard or DIY shop, and all joins are simply butted, glued, and nailed. This is a slight change from period construction, where the front and back boards would usually be lapped with notches cut in the side pieces and the floor held by a dado, but modern glue will help make up for the weakened joint in this simplified version.
Design
The maximum dimensions for cabin baggage on easyJet1 are 56x45x25cm. As a standard chair is around 45cm high, using that dimension as the height will yield the most comfortable seat. 25cm is a good depth for a backless bench, and a width of 56cm allows plenty of room for storage.
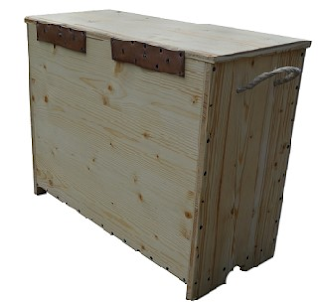
The rope handles are soft and retractable, and there is a hidden (modern) closure to avoid any extra bulk for the closure. The lid is the largest piece, as it will overhang slightly on three sides.
You might be tempted to have the bottom of your chest sit directly on the floor to maximise the storage space, but it makes good sense to raise it a few cm off the ground. Not only will it be less wobbly to sit on, it will also keep the chest and its contents dry.
Materials
Wood

If your wood is significantly (more than 5mm) thicker, make sure you adapt the dimensions of your pieces accordingly! You will need to subtract the difference in thickness from the length of the sides, and twice the difference from the width of the front and back. The dimensions of the lid stay the same.
The floor needs to be adapted to the exact thickness of your material in any case. Its width is the width of your side pieces minus twice the thickness of your wood; the length is the same as that of the front and back.
Parts List
Get the wood pre-cut to these exact dimensions unless you have the tools and experience to cut it accurately yourself. Usually, they will ask for your dimensions in mm.
Lid: 54cm x 24.5cm (540mm x 245mm) – you need one of these
Floor: 50cm x 21 (500m x 210mm) – you need one of these
Front & Back: 50cm x 39.5cm (500mm x 395mm) – you need two of these
Sides: 42.5cm x 23.5 (425mm x 235mm) – you need two of these
Rope
You can use natural hemp or hemp-like synthetic rope. Approximately 8mm to 10mm thick, 1m long. Tape is handy for wrapping the ends to prevent fraying and makes it easier to put through the holes.
Wood Glue
This can be regular hide glue or quick-drying, waterproof, etc., but it has to be wood glue .
Nails
You will need approximately 70 blackened wire nails with a wide head, around 2mm wide and twice as long as the wood is thick. Stainless steel, zinc-plated, etc. just won’t look medieval.
Hinge
My chest uses a nailed leather hinge as a simple, period solution. A piece cut from an old belt works well. A small wooden wedge attached to the chest with a string keeps the lid open for easier packing, as the stiff leather tends to pull the lid shut. You can also use a metal hinge, just be mindful of the potential added bulk and make sure it still fits the maximum dimensions. It can be sunk using a chisel.
Catch
I’m using a modern ball catch inside the chest to keep it closed – if you prefer a pretty medieval one on the outside, perhaps to match the hinges, keep the final dimensions in mind here as well.
Finishing
Finish isn’t mandatory, but adds to the look and the longevity of your chest. I finished mine using beeswax polish – other options include paint, stain, boiled linseed oil or even varnish. For something that will be exposed to a lot of moisture, marine-grade polyurethane varnish is a non-period but highly recommended option.
Tools
You will need at minimum a hammer and a drill, with a bit large enough to make holes for the handles. Sandpaper, a plane, or a file are needed to finish the edges of your cut wood. The catch is easiest to mount using small screws and an appropriate screwdriver..
The small architectural detail on the legs of my chest was made using a forstner drill bit to make larger holes, but you could also just use a saw to cut a triangle, or skip this step entirely.
Assembly
Before you begin, measure all your pieces to make sure the dimensions are right – one of my pieces had been mis-cut. Next, drill holes for the handles, about 5cm from the top of the side pieces and a hand’s width apart. Mark where the floor of the chest will sit – you can simply draw a line using the front or back piece – then cut a notch close to, but still under this line for the feet.

1 - Different options for making feet.

2 - The front and back attached to the floor.
Next, make a “U” shape from the front, back, and floor. Put a line of glue along the long side of the bottom piece, then nail the front or back to it to make an L. If you don’t have a workbench in which you can clamp the bottom piece flush and then lay the other piece on top, you can put a pile of books underneath to make this easier. (Just don’t get the glue on the books!) For even spacing of the nails, start with a nail at each end, then one in the middle, then another at the halfway point between those, etc. Wipe off any glue that squeezes out before it dries – be aware that it will block any stain you are using. When your “U” is assembled, glue and nail on the sides, making sure the tops of all parts are flush. At this point, you should gently round off all exposed edges and corners (including those on the lid, which we haven’t attached yet) with sandpaper or a rasp. This saves a lot of thinking about which edges to round and which ones to leave square!

3 - The sides attached to the U-shaped piece.
If you want to varnish, paint or stain the box, now is a good time, as you can still reach all the parts and the lid won’t get stuck shut. Especially make sure to protect the bottoms of the feet, as the end grain coming in contact with damp ground can wick moisture into the box.
Now stand your box up on a smooth surface – if it wobbles, gently sand the feet until it’s balanced. Next, nail the leather strip – either one strip nearly the length of the box or several smaller ones evenly spaced – on the long side of the lid of the chest, flush with the top. Lay the lid on the chest so that it overhangs both sides evenly and the back edges are aligned, then nail the leather hinges to the back of the box. Finally, attach your clasp.
For the handles, round off the edges of the holes with a file to make sure they don’t fray the rope, then pull the rope through so the loose ends are inside the box. You can either tie the ends together or make large individual knots that won’t slip through the holes. Ensure that both handles are the same length for balanced carrying. Ideally, your handles should be long enough to go over the top of the box, as this will make it much easier to carry!
Travel Tips

The easiest way to deal with this chest as a piece of hand luggage is with the help of two long quick-adjust luggage straps (mine are 350cm, from IKEA). They can be used to fasten the chest to your wheeled suitcase for travel to/from the airport, pulled through the rope handles to make a shoulder strap for when you’ve checked your luggage, and can be wrapped around the chest to keep it closed in the overhead locker.
Like many budget airlines, easyJet encourages passengers to check their hand luggage free of charge. You can make use of this to avoid having to carry the chest around – just offer to check it voluntarily, and the desk agent will usually agree once you’ve demonstrated that it fits the sizer!
If you plan to use the chest indoors – whether at events or as a side table at home – you can glue felt or cork to the feet to protect the floors.
Happy travels!
Footnotes
- To adapt the chest to the restrictions of the airline you are using, just ensure that it is about 1cm smaller in each dimension than the maximum allowed, so that it will easily fit in the luggage sizer – wood doesn’t squish like your regular bag will!
- This means it’s made of three layers, usually a lumber core and two thin pieces of veneer on the outside, rather than lots of thin, crossed layers like plywood.
- NB: for simplicity, I am using “length” to refer to the longer side and “width” for the shorter on all pieces, regardless of their final orientation on the finished chest. Ideally, you want the “length” to run along the grain of the wood, especially if not using plywood/core board. This increases the load-bearing capacity.
- Unlike other glues, wood glue, traditionally made from boiled hide, is not sticky. Instead, it is squeezed into the pores of the wood under pressure and hardens there, acting like hundreds of tiny dowels. The nails really only serve to hold the two pieces together until the glue has set.
No comments:
Post a Comment